|
Appendix
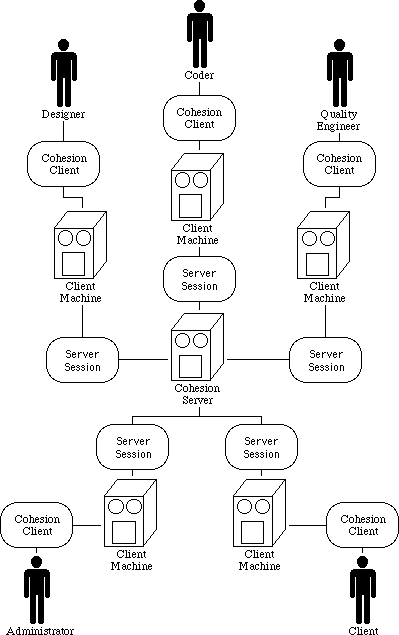
A : External Context Model

Appendix
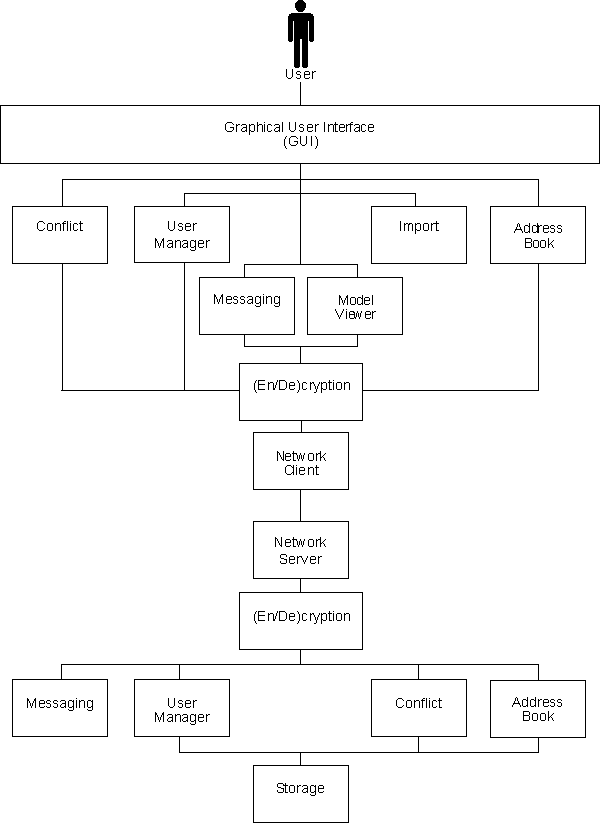
B : Internal Context Model

Appendix
C : Use Cases
Functional description of
model viewer/designer
Primary use is to create
shapes / objects which will represent nodes, arcs and terminating nodes.
1. New Package
2. Open Package
3. Save Package
4. Save as Package
5. Close Package
6. Open meta-model
7. Graphical functions
7.1 Draw circle / fill circle
7.2 Draw rectangle / fill
rectangle
7.3 Place text
7.4 Draw line
7.5 Fill shapes / areas
8. Creation of nodes
9. Creation of arcs
10. Creation of termination
nodes
11. Design Package on meta-model
12. Select shapes / objects
13. Cut selected objects
14. Paste selected objects
15. Move selected objects
16. Alter dimensions of
selected objects
17. Set / alter colour of
selected objects
18. Set / alter line types.
19. Delete selected shapes
/ objects
20. Add shapes to package
21. Edit shapes to package
22. Delete shapes from package
23. Undo and redo changes
New Package
- Select “File” menu.
- Select “New Package”.
Open Package
- Select “File” menu.
- Select “Open Package”.
Save Package
- Select “File” menu.
- Select “Save”.
Save As Package
- Select “File” menu.
- Select “Save As…”
- Type name of package.
- Hit “Enter”
Close Package
- Select “File” menu.
- Select “Close Package”.
Draw shape (circle / fill
circle / rectangle / fill rectangle / line)
- Select desired shape
- Drag mouse over drawing
pane.
- Let go of mouse when desired
dimensions of shape appear.
Move shapes
- Click mouse over desired
shape
- Drag to desired position.
Alter dimensions
- Select shape.
- Place mouse over a control
point (mouse icon should change)
- Drag to desired dimension.
Copy shape
- Select shape.
- Select “Edit” menu.
- Select “Copy”.
- Shortcut: Ctrl + C
Cut shape
- Select shape.
- Select “Edit” menu.
- Select “Cut”.
- Shortcut: Ctrl + X
Paste shape
- Select shape.
- Select “Edit” menu.
- Select “Paste”.
- Shortcut: Ctrl + V
Undo last change
- Select “Edit” menu.
- Select “Undo”.
Set / Alter colour of
shape
- Select shape
- Select colour from colour
palette
Set / Alter lined type
of shape
- Select shape
- Select line type (either
dashed, solid, dash-dot-dash, etc…) from
Delete shape(s) from pane
- Select shape
- Press <DEL> key or…
- Select “Edit” menu.
- Select “Delete Shape”.
Creation of nodes / arcs
/ termination nodes
- Select appropriate page
/ tab (separating node / arc / termination node creation functionality)
- Create desired node /
arc / termination node.
- Give node / arc / termination
node a “Type”.
- Click “?” button on dialog
or…
- Select “Shape” menu
- Select “Add to Package”.
Creation of Package conforming
to meta-model
- Open desired meta-model
- Types should be listed
for nodes / arcs / termination nodes on associated pages / tabs
- Select “Type” on respective
page / tab
- Create element on drawing
pane
- Click “?” button on dialog
or …
- Select “Meta-Model” menu
- Select “Add to Model”.
Edit existing node / arc
/ termination node in package
- Select appropriate page
/ tab
- Select shape in “Package
Tree” (could be either a Jtree or Jlist)
- Press “?” button on dialog
or..
- Select “Shape” menu.
- Select “Edit Element”.
Delete existing node /
arc / termination node from package
- Select appropriate page
/ tab
- Select shape in “Package
Tree”
- Press <DEL> key or
…
- Select “Shape” menu.
- Select “Delete Element”.
Add User
1. Add a user
to the system
1.1. Login
1.1.1. Select
login
1.1.2. Wait
for login to show
1.1.3. Select
server
1.1.4. Type
in user name
1.1.5. Type
in password
1.1.6. Press
ok
1.2. Open user
manager
1.2.1. Select
user manager option
1.2.2. Wait
for dialog to show
1.3. Click
add button
1.4. Wait for
dialog
1.5. Enter
details
1.5.1. User
name
1.5.2. Full
name
1.5.3. Email
address
1.5.4. Password
1.5.5. Privilage
1.6. Press
OK
1.7. Wait for
confirmation
1.8. Close
user manager
Edit user
1. Edit a user
1.1. Login
(See Add user 1.1)
1.2. Open use
rmanager (See Add user 1.2)
1.3. Select
a user from list
1.4. Click
edit button
1.4.1. Wait
for dialog
1.5. Edit details
(see Add user 1.6)
1.6. Press
ok
1.7. Wait for
confirmation
1.8. Close
user manager
Remove a
user
1. Remove a
user
1.1. Login
(See add user 1.1)
1.2. Open user
manager (See add user 1.2)
1.3. Select
user from the list
1.4. Click
remove button
1.5. Wait for
confirmation
1.6. Close
user manager
Create a
package
1. Create a
package
1.1. Select
new package from menu
1.1.1. Wait
for dialog
1.2. Choose
meta model
1.3. Enter
name of new model
1.4. Press
enter
1.5. Create
new node/arc
1.5.1. Select
new
1.5.2. Select
tool to daw with
1.5.3. Draw
1.5.4. Repeat
from 1.5.1 until done
1.5.5. Select
type (what it represents in meta model)
1.5.5.1. If
not from meta model, give a name
1.6. Repeat
1.5 until package is complete
Send direct internal and/or
SMTP message
Pre Conditions
1. A user with appropriate
permission to send a message is logged on.
2. User has opened a Send
Message Dialog.
Use Case 1: Enter valid
message details
1. User enters a list of
receivers.
2. User enters a subject
for the message (not required).
3. User enters a text message
in the message field (not required, but recommended)
4. User selects SEND button.
5. Message details passed
to server.
6. Server runs through each
receiver in the receiver list, and determines whether it is an SMTP message
receiver or a Direct Message receiver.
7. Message sent to all receivers
in appropriate format.
8. If a direct message,
the message is displayed on the relevant user’s screen (if they are logged
on.
9. If a SMTP message, the
message will eventually appear in the INBOX of all SMTP receivers.
Use Case 2: Enter invalid
message details
1. User does not enter any
receivers for the message.
2. User enters other relevant
details.
3. User selects SEND button
4. Message is not sent…
no receivers entered to send it to.
Side Script 1: No Receivers
listed
1. If no receivers are listed,
a message dialog stating “There are no receivers listed to send the message
to” will be displayed.
2. OK button selected on
message dialog to remove message.
Post Conditions
A list of receivers must
be provided with the message.
User Interface/Reports
Add address book entry
Pre Conditions
1. A user with appropriate
permission to modify the address book is logged on.
2. User has opened the Address
Book Dialog, either from the Send Message Dialog, the toolbar or the menu.
Use Case 1: Enter valid
address details
1. User enters required
address attributes.
2. User selects ADD button.
3. New Address Book entry
saved.
Use Case 2: Enter invalid
address details
1. User enters required
address attributes.
2. User selects ADD button
3. An address entry with
the same name already exists.
Side Script 1: Address
entry already exists
1. If address entry with
the same name already exists, a message dialog stating “Address entry with
this name already exists” will be displayed.
2. OK button selected on
message dialog to remove message.
Post Conditions
User Interface/Reports
Retrieve address book
Pre Conditions
1. A user with appropriate
permission to view the address book is logged on.
Use Case 1: Display Address
Books
1. User opens Address Book
Dialog.
2. Address Book Dialog retrieves
address book entries from the server (if available)
3. Address Book Dialog displays
server address book entries.
4. Address Book Dialog retrieves
address book entries from the local file system
5. Address Book Dialog displays
client address book entries.
Post Conditions
User Interface/Reports
Modify address book entry
Pre Conditions
1. Uer with appropriate
permission to modify the address book is logged on.
2. User has opened the Address
Book Dialog, either from the Send Message Dialog, the toolbar or the menu.
Use Case 1: Enter valid
address details
1. User selects an address
entry to modify.
2. User modifies desired
address attributes (still provides required attributes).
3. User selects MODIFY button.
4. Address Book entry modified.
Use Case 2: Enter invalid
address details
1. User selects an address
entry to modify.
2. User modifies desired
address attributes (still provides required attributes).
3. User selects MODIFY button
4. An address entry with
the same name already exists.
Side Script 1: Address
entry already exists
1. If address entry with
the same name already exists, a message dialog stating “Address entry with
this name already exists” will be displayed.
2. OK button selected on
message dialog to remove message.
Post Conditions
User Interface/Reports
Send Mail
Pre Conditions:
1. User with appropriate
permission to send mail is logged on.
2. Client is connected to
the server.
Use Case 1: Enter valid
message details
1. Bring up send mail screen
2. User enters receivers
2.1 User types in receivers
manually OR
2.2 User selects receivers
from address book
3. User enters message details
4. Users sends message
5. Message details are passed
to the server
6. Server sends SMTP message
to all recipients
Use Case 2: Enter invalid
message details
1. User does not enter any
receivers for the message.
2. User enters other relevant
details
3. User selects send button
4. Message is not sent…
no receivers entered to send it to.
Side Script 1: No receivers
listed
1. If no receivers are listed,
a message dialog stating “there are no receivers listed to send the message
to” will be displayed.
2. OK button selected to
message dialog to remove the message.
Post Conditions:
1. Send mail dialog is no
longer displayed
2. Copy of message is saved
in outbox
Select user from address
book
Pre Conditions:
1. A user with appropriate
permissions to view the address book is logged in.
Use Case 1: make address
book selection
1. User opens address book
dialog
2. Dialog retrieves address
book from server (if available).
3. Dialog retrieves address
book locally.
4. Dialog displays address
books.
5. User makes single or
multiple selection.
6. User presses select button.
Post Condition:
Add user to address book
Pre Conditions:
1. A user with appropriate
permission to modify the address book is logged on.
2. User has opened the address
book dialog, either from the Send message dialog, the tool bar or the menu.
3. The address book dialog
has retrieved the address books.
Use Case 1: Enter valid
address
book details
1. User selects location
to add entry, locally or on the server (if available).
2. User enters required
address attributes.
3. User selects ADD button.
4. New address book entry
saved.
Use Case 2: Enter non
unique address entry
1. User selects location
to add entry, locally or on the server (if available).
2. User enters address attributes.
3. User selects ADD button.
4. An address entry with
the same name already exists.
Side Script 1: Address
entry already exists
1. If an address with entry
with the same name already exists, a message dialog stating “Address entry
with this name already exists” will be displayed.
2. OK button selected on
message dialog to remove message.
Post Conditions
1. Address book dialog displayed
with updated address book.
Edit / remove user in
address book
Pre Conditions:
1. User with permission
to modify the address book must be logged in
2. User has opened the address
book dialog, either from the send mail dialog, the tool bar or the menu.
Use Case 1: Edit valid
address details
1. User selects an address
entry to modify.
2. User modifies desired
address attributes.
3. User selects save
button
4. Address book entry is
modified.
Use Case 2: Remove address
book entry
1. User selects address
to remove.
2. User selects delete button
or presses delete key.
3. Confirmation message
is displayed.
4. If confirmed, address
book entry is deleted.
Use Case 3: Address is
modified to non unique name
1. User selects an address
entry to modify.
2. User modifies desired
address attributes.
3. User selects save
button
4. Address book entry with
same name already exists.
Side Script 1: Address
entry already exists
1. I fan address book entry
with the same name already exists, a message dialog stating “Address entry
with this name already exists” will be displayed.
2. OK button selected on
the message dialog to remove the message.
Post Conditions:
1. Address book dialog is
displayed with an updated version of the address book.
Send Direct Message
Pre Conditions:
1. A user with appropriate
permission to send a direct message is logged in.
2. The client is connected
to the server.
Use Case 1: Send message
to recipient
1. Display send message
dialog
2. Dialog lists users who
are currently logged on to the server.
3. Dialog displays a list
of message received during this session.
4. User selects recipient
to reply to.
4.1 User selects recipient
from list of users currently logged in
4.2 User selects recipient
by choosing a previous message to reply to.
5. User enters message
6. Users selects send button.
7. Message details are passed
to the server.
8. Server sends message
details to the recipient.
Use Case 2: Recipient
rejects message
1. Display send message
dialog
2. Dialog lists users who
are currently logged on to the server.
3. Dialog displays a list
of message received during this session.
4. User selects recipient
to reply to.
4.1 User selects recipient
from list of users currently logged in
4.2 User selects recipient
by choosing a previous message to reply to.
5. User enters message
6. Users selects send button.
7. Message details are passed
to the server.
8. Server sends message
details to the recipient.
9. Recipient’s preferences
reject direct message.
Side Script 1: Message
rejected
1. If the recipient has
chosen not to receive direct messages a message will be displayed stating
“Recipient is not receiving any messages”.
2. OK button selected on
message dialog will remove message.
Post Conditions:
1. Message dialog is no
longer displayed.
Receive Direct Message
Pre Conditions:
1. User with appropriate
permission to receive messages must be logged in.
2. Client must be connected
to the server.
3. The user preferences
must be set to enable the receiving of direct messages
Use Case 1: Receive direct
message
1. Notify user that a new
direct message has been received
2. Store message locally.
3. User view message
4. List past messages received
this session.
Post Conditions
Set mail / message preferences
Pre Conditions:
1. User with permission
to modify user settings is logged in.
Use Case 1: Modify mail
/ message preferences
1. Display mail / message
preferences dialog
2. User set return e-mail
address.
3. User set outgoing mail
server.
4. User set message notification
level.
5. User set message receive
enable / disable
6. Ok select on set mail
/ message preferences dialog saves preferences.
Post Condition:
1. Set Message / Mail preferences
dialog is no longer displayed
Appendix
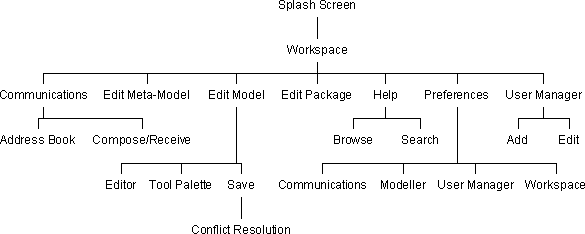
D : Hierarchical User Interface Decomposition

|


