Navigation Area The latest news about Team Synergy Information about Projects undertaken by Team Synergy Team Synergy Member Profiles Team Synergy Member Management Team Synergy Project-related Documentation Team Synergy Meetings Archive Downloads relating to Team Synergy Projects Funny Stuff Team Synergy Logo
Icon Navigation Home Help / Frequently Asked Questions Products Site Site Map Email the Webmaster

Cohesion - Client User Guide

Version 0.9d

Edition 1
Document ID: CUG
Author:  Matthew Allen
Reviewed by:   
Date:  9 October 1999


Revision History
Date Modifications Reason Version
1999.08.20  Outline drawn up (NP) Initial document collation 0.0d
1999.09.02 Document contents formatted (NP) Conformance to Style Specification  0.1d 
1999.10.09 Heavy document re-structure  (JP)  Updated to reflect the requirements of the documentation 0.2d 
1999.10.10 Content Added (MA) Major addition of content. 0.5d 
1999.10.11 Document Created (MA) Created separate document for Client User Guide 0.5d 
1999.10.12 Content Added Added various sections 0.51d 
1999.10.13 Reviewed by QA (JC, MS) QA suggested changes made. 0.52d 
1999.10.14 Major Content addition and changes (MA) Reviewed by QA (JC) 0.9d 


1. Introduction
1.1 Welcome
Welcome and Thank-you for choosing Cohesion. Cohesion is an Advanced Semantic Net Modelling tool packed with a multitude of features, including :
Modelling Language Creation Cohesion facilitates the creation of custom modelling languages. This is achieved by the user fully specifying new base Meta-Model and Notation(s)*. These can be extensions or modifications of existing modelling languages.

It is also possible to create an entirely new modelling language. Cohesion is not just limited to using OML and UML.

*Several notations can be made for a particular meta model, allowing customised looks for the meaningful meta-information.
Create and Change Models Models can easily be created using Cohesion's advanced modeller.

Advanced Feature : change Notations on the fly to see how they look!
User management Cohesions user management features enable secure remote-system access control.

Users have associated privileges that allow/disallow interaction with the server repository*, giving users ease for workgroup features.

*Note that because of cohesions open and extensible code base the privilege system can be utilised by any extensions to the product.
MessagingCohesion supports sending of both E-Mail and Instant messages and the viewing and storage of Instant messages from within Cohesion.
Address bookBoth a locally stored and server stored Address Book can be maintained. Now you can move from computer to computer, and your Address Book virtually comes with you.
File ManagementBoth projects and models can be stored locally for individual use or stored remotely so that a number of people can access them.

If a more than one person uses a remote file, then a Concurrent Versioning System is used to maintain one master copy, and changes made are integrated into this copy.

Users do not need to use any file-locking and if a conflict occurs, one person needs to decide which parts of the conflicts to use.

1.2 Who should read this guide ?
This guide is for :
  • Software Developers
  • Software Designers
  • Quality Engineers
  • System Administrators*

*Cohesion when used in an network environment requires at least one assigned Administrator. Administrators should also refer to the
Cohesion Administration Manual

1.3 What does this guide cover ?
This Client User Guide provides an introduction to the Cohesion client.

It specifies the minimum system requirements and detailed installation requirements for the Cohesion client on Windows 9X / NT and Unix based systems.

NOTE: Operation of Cohesion on Unix based systems has not been extensively tested.

It describes Cohesion's Main Window, menu items and detail the steps and provide screen shots on :
  1. Starting a Cohesion client
  2. Connecting to a server
  3. Creating a new Meta-Model and Notation
  4. Logging Out and Quitting Cohesion
  5. Using Cohesion's Online Help

This guide also contains a How Do I? section that shows you how to perform the most common tasks in Cohesion, e.g. Sending an E-mail.

Use this guide to prepare you for using Cohesion. If you are after detailed steps on how to perform a task that is not covered in this manual, please consult Cohesion's Online Help, see 5. Using Cohesion's Online Help.

1.4 Conventions used in this guide
This guide will adhere to the following conventions,
Cohesion screen shots Where screen shots are used, they will be given an informative description and a figure reference number that represents which section the screen shot is located in and the number of that screen shot in that section,
i.e. Figure 2.3 - 2 represents the 2nd screen shot of the section 2.3

All screen shots will be labelled with single characters ranging from A to Z that will represent a certain part of the screen shot. These labels will be referred to in the descriptive text that follows the screen shot and will appear as, (A) (B) (C)...(Z).

2. Concepts and Definitions
This section explains the terms and concepts that are used throughout Cohesion :

Term Description
Modelling Language A modelling language is comprised of
1. a Meta-Model (see below), e.g UML: Unified Modelling Language
and
2. a Notation (see below) , drawing objects that graphically represent the Meta-Model.

When a Modelling Language has been defined, Models can be constucted based upon the Modelling Language.

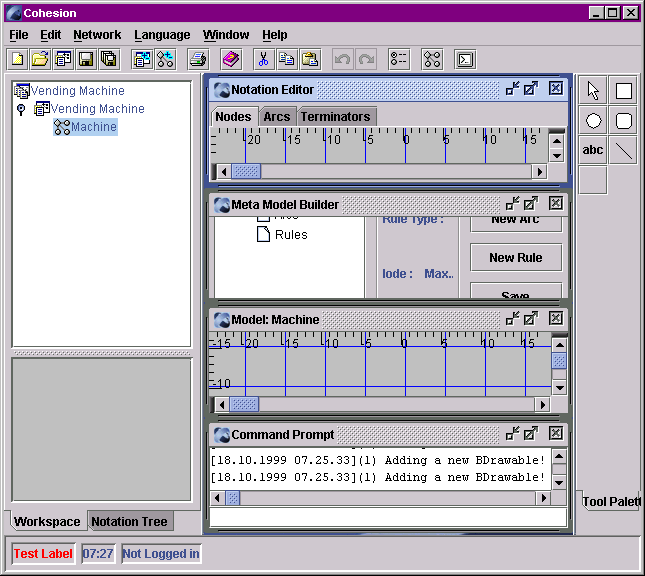
Users of Cohesion have the facility to create their own Modelling Language
Meta Model Encapsulates the meaning of a Modelling Language.

Each object in the Modelling Language is assigned a name and attributes.

Meta Models are comprised of the abstract concepts of Nodes, Arcs and Rules
Notation A Notation specifies for each Node and Arc the graphical representation to be used when drawing Models.

This is especially useful for people who like to customise the look of their Models.
Nodes Nodes, conceptual objects contained in the Meta-Model. For example, 'Class' is a Node contained within the UML Modelling Language.
Arcs Arcs are connections between Nodes. For example, 'Association' is an Arc common in many Modelling Languages.
Rules Rules, specify the interaction of Nodes and Arcs within the Meta-Model. For example you can specify which Nodes are allowed to connect to each other.
Terminator A small graphic which is placed at the end of an arc to give it a meaningful graphic represetnation, used when creating a notation.
Model A diagram constructed from a Modelling Language.
Workspace Contains a list of Projects.
Project A collection of Models.

3. System Requirements and Installation 3.1 System Requirements
Cohesion can be used on numerous platforms, each with different hardware/software requirements needed for Cohesion to run properly. These are detailed below.

Minimum System Requirements :-

All Systems

Windows 95/98/NT
  • Pentium®233
  • 64 MB RAM
  • Mouse and Keyboard

Unix Based Systems
  • X-Window Support for the client. X-Window support is not required for a server.

Recommended System Requirements :-
All Systems
  • 17" SVGA Monitor with 24-bit colour display capabilities.

Windows 95/98/NT
  • Pentium®333 and above
  • 128 MB RAM

Optional :-
  • Network Connection with TCP/IP installed (Recommended).


3.2 Installation Instructions

Cohesion requires Sun Microsystems JRE (JavaTM Run-time Engine) 1.2 to be installed and properly configured. Instructions for downloading and installing Sun MicrosystemsTM JRE 1.2 can be found at this WWW address http://java.sun.com/products/jdk/1.2/jre/index.html

If you require more help with installing Java, the following usenet groups are devoted to Java :
3.2.1 Installing Cohesion on Microsoft Windows 95 / 98 / NT
After you have downloaded the Cohesion Installation File (cohesion-1.0-final.exe), proceed with the following steps :
  1. Double-click on the 'My Computer' icon on your desktop,
  2. Select the drive in which you saved the Cohesion Installation File, e.g. c:
  3. Select the directory in which you saved the Cohesion Installation File, e.g. c:\temp
  4. Double-click on the Cohesion Installation File, cohesion-1.0-final.exe,

    The following screen will then be displayed.
    Initial screen displayed by Installation File
    Figure 3.2 - 1: Initial screen displayed by Installation File.


  5. Type, in the 'Unzip To Folder' field, the directory you wish to install Cohesion, e.g. c:\apps\cohesion
  6. Click the 'Unzip' button,

    Cohesion will now install to the directory you specified. This process may take a few minutes.

  7. When Cohesion has finished installing, your computer will beep and the following screen will be displayed
    Screen displayed when installation completed
    Figure 3.2 - 2: Screen displayed when installation completed.


  8. Click the 'OK' button to close this window,
  9. Click the 'Close' button (see Figure 3.2 - 1) to quit the Cohesion Installation File.

    Congratulations, Cohesion has now been installed.

3.2.2 UNIX-based systems
After you have downloaded the Cohesion Installation Zip File ( cohesion-1.0-final.zip), proceed with the following steps :
  1. Go to the directory where you saved the Cohesion Installation Zip File
  2. type : unzip cohesion-1.0-final.zip to uncompress the file

    Congratulations, Cohesion has now been installed.

3.3 File Type Description

CWS Cohesion WorkSpace file, stores references to multiple projects.
CWS Cohesion PRoject file, stores references to multple models.
CMO Cohesion MOdel file, stores individual models (as well as a copy of the notation and meta-model it uses, the notation is swappable).
CMM Cohesion Meta-Model, stores semantic data related to a modelling language.
CNT Cohesion Notation, stores the graphical representation of the meta-model it is based upon (as well as a copy of the meta-model it is based upon).


4. Quick Start Guide For the purpose of this guide, it is assumed that you have successfully followed the steps as described in 3.2 Installation Instructions.

4.1 Loading the Cohesion Client

The first step in this Quick Start Guide is to load the Cohesion client. The process to do this, for both Windows (95/98/NT) and Unix based systems are detailed below :
  • Windows 95/98/NT
    1. Double-click on the 'My Computer' icon on your desktop,
    2. Select the drive where you installed Cohesion, e.g. c:
    3. Select the directory where you installed Cohesion, e.g. c:\apps\cohesion
    4. Double-click on the Client executable file, 'client.bat',
  • Unix Based Systems
    1. Go to the directory where you unzipped Cohesion to, e.g. /usr/bin/cohesion/
    2. type : java -jar bka.jar to load the client.


4.2 Logging into a Cohesion Server

The next step is to log onto a Cohesion server. Please note, this step is not required, you only need to log onto a server if you wish to be able to send or receive B-Mail messages, need to work on a project that is located on the server or need to access the server's CVS repository.

To log in to a Cohesion Server :
  1. Select "Login" from the "Network" menu.

    The following dialog will be displayed:
    Login dialog
    Figure x.x - x: Login dialog.

  2. Select a server from the drop-down list (A)
    OR
    Type in the name or IP address of a server in the text field, (B), if you wish to connect to a server that is not displayed.

  3. Type in your User Name in the "User Name" text field, (C).
  4. Type in your Password in the "Password" text field, (D).

    As you type in your password, your password will not be displayed, for security reasons. Only asterisk's, *, will be displayed.
    NOTE : Your user name and password should be provided to you by a Cohesion Administrator and should be changed by you immediately on receipt of it.

  5. Click on the "OK" button, (E) to log onto the server
    OR
    Click on the "Cancel" button, (F) to cancel the logging in process.

If the login is successful, your "Login Status", (see
6. Navigation around Cohesion) will tell you which server you are logged into, e.g. "Logged into it-students.swin.edu.au".
If the login fails, an error dialog will be displayed showing the reason. The possible errors that could occur are described below :
Error Message Description
Login Failed. Host not found <server name>. Check the host name before trying again. The client can't find or connect to the specified server. If this occurs, contact your Cohesion Administrator
Login Failed. Authentication failed. Your user name or password are invalid. Try logging in again making sure of your spelling and case. If you still can't log on, contact your Cohesion Administrator


4.3 Creating a new Meta-Model and Notation
Before you proceed with this tutorial, please make sure you have read and understand the concepts and terms as described in Concepts and Definitions.

For a more comprehensive guide to Creating a New Meta Model and Notation, refer to the Online Help.

4.3.1 Creating a New Meta Model
  1. Select "New Meta Model" from the "Language" Menu.
  2. A simple dialog titled "Meta Model Builder" will pop up. Specify the name of the new Meta-Model.
  3. Click the "OK" button
  4. Use the meta-model builder to create Nodes, Arcs and Rules.

    Creating a Node
    1. Click the "New Node" button.
    2. Enter a name in the "Name" text field to identify this Meta-Node.
    3. If the Node has properties, then type the Property name in the "New Property" text field and click the "Add" button.
    4. To add more properties, repeat step 3.

      Notes:
      You can change the name of a node at any time, by re-typing over the node's name in the "Name" text field.
      You can Remove properties by selecting the property and click the ">" button to place it in the removed properties bin.
      To Restore properties that are in the "Removed Properties" bin, select the property and click the "<" button.


    Creating an Arc
    1. Click the "New Arc" button.
    2. Enter a name in the "Name" text field to identify this Meta-Arc.
    3. If the Arc has properties, then type the Property name in the "New Property" text field and click the "Add" button.
    4. To add more properties, repeat step 3.

      Notes:
      You can change the name of a arc at any time, by re-typing over the arc's name in the "Name" text field.
      You can Remove properties by selecting the property and click the ">" button to place it in the removed properties bin.
      To Restore properties that are in the "Removed Properties" bin, select the property and click the "<" button.


    Creating a Rule
    1. Click the "New Rule" button.
    2. Enter a name in the "Name" text field to identify this Meta-Rule.
    3. Choose the type of this Rule from the "Rule Type" drop-down list.

      Type of Rules that can be created are :-
      Max-In Rule Specifies for a type of node the maximum number of arcs of a specified type may connect to the node.
      Max-Out Rule Specifies for a type of node the maximum number of arcs of a specified type may depart from the node.
      Node Connection Rule Allows/Disallows which nodes are allowed to connect to each other using which arcs.
      Circular Referencing Rule Allows/Disallows arcs which will cause circular references.

      Definition of circular reference: an arc may not follow the same arc type back to the origniting node.
    4. Select the details for the rule.

  5. After defining your Nodes, Arcs and Rules for the new Meta-Model, click the "Save" button.
  6. A File Save dialog will appear, enter a file name, e.g. myMetaModel.cmm
  7. Click the "Save" button to save the Meta-Model to disk.


4.3.2 Creating a new Notation
A Notation in Cohesion is the graphical representation of the meta-model. Using the 'Notation Editor', nodes, arcs and arc terminators can be drawn to create the new Modelling Language.
  1. Select "New Notation" from the "Language" menu
  2. A simple dialog titled "New Notation" will pop up. Specify the name of the new Notation.

    Now you need to specify a Meta-Model to base the notation on

  3. Click the "Browse..." button

    This will display an Open File dialog.

  4. Select a Cohesion Meta Model file (.cmm) and click the "Open" button
  5. Click the "OK" button

    The following windows will be displayed.

    Notation Tree Tab Lists the Notation name and branches containing nodes, arcs and terminators
    Notation Editor Window The Notation Editor is where you can draw the visual representation for nodes and terminators, and specify arcs.

    The Notation Editor has three tabs
  6. Nodes
  7. Arcs
  8. Terminators.
  9. Tool Palette Contains all the tools which may be utilised on the differnet tabs, changing to the different tabs gives a different set of tools which are applicable.

    Drawing a Node

    1. Select a Node from the Notation Tree tab (under the Nodes branch), by expanding the Nodes sub-tree and selecting the name of the Node which you want to draw.
    2. Select an appropriate tool from the Tool Palette to create the node representation, for example the rectangle tool is probably a good start for a visual representation of a class.
    3. Click and drag on the Notation Editor to create a visual representation
    4. Now, right-click on the newly created object. A pop-up menu is displayed that allows you to Send to Back, Send to Front and change its Properties (Line Colour/Width/Style, Fill Colour etc).
    5. Repeat steps 2 to 4 to add more drawing objects to represent this Node.

      If the Node has properties
    6. Click on the Node property
    7. Select the "abc" tool from the Tool Palette
    8. Click and drag on the Notation Editor to visually represent the property
    9. When you have finished with the current Node, repeat steps 1 to 8 for each Node you need to visually represent.


    Specifying Arc Properties

    1. Select an Arc from the Notation Tree tab (under the Arcs branch), by expanding the Arc sub-tree and selecting the name of the Arc which you want to define.
    2. The "Notation Editor" will automatically switch to the "Arcs" tab
    3. In the "Line" section of the Notation Editor, select the Colour, Style, Dash and Weight from the relevant drop-down list
    4. Select an Arc Style from the "Arc Style" drop-down list. There are 3 types of Arc Style :
      • Straight : Connects nodes with a straight arc.
      • Curved : Connects nodes with a curved arc.
      • Stepped : Connects nodes with a stepped arc.
      If "Stepped" is chosen, you can optionally specify the Arc Terminator* to be placed on the "Steps" of the Arc.

    5. If necessary, select the Beginning Terminator* from the "Beginning Node" drop-down list.
    6. If necessary, select the End Terminator* from the "End Node" drop-down list.
      These will be drawn when connecting Nodes.

      *Refer to the Creating a Terminator section below, for a guide to creating Terminators.


    Creating a Terminator

    1. Select "Add Terminator" from the "Language" menu

      A simple dialog titled "Add Terminator" will pop up.

    2. Type the name of the new Terminator in the "New Terminator" text field
    3. Click the "OK" button
    4. Select the newly created Terminator from the Notation Tree tab (under the Terminators branch), by expanding the Terminators sub-tree and selecting the name of the Terminator which you want to draw.
    5. Select an appropriate tool from the Tool Palette to create the Terminator representation
    6. Click and drag on the Notation Editor to create a visual representation
    7. Now, right-click on the newly created object. A pop-up menu is displayed that allows you to Send to Back, Send to Front and change its Properties (Line Colour/Width/Style, Fill Colour etc).
    8. Repeat steps 5 to 7 to add more drawing objects to represent this Node.
    9. When you have finished with the current Terminator, repeat steps 1 to 8 for each Terminator you need to visually represent.


  10. Select "Save Notation" from the "Language" menu.

Your new Notation has been saved and is now ready for use.


4.4 Printing Notations and Models
You can print anything that is displayed in the Modeller Viewport.

To print the Modeller Viewport :
  1. Click the "Print" icon on the Toolbar
    OR
    Select "Print" from the "File" menu.


4.5 Logging Out and Quitting Cohesion
To log out of Cohesion Server:
  1. Select "Logout" from the "Network" menu

To quit Cohesion :
  1. Select "Exit" from the "File" menu

5. Using Cohesion's Online Help Cohesion displays its online help topics in the Online Help Viewer.

To display Online Help Viewer, select "Help Contents" from the "Help" menu.


Online Help Viewer with Contents section visible
Figure 5.0 - 1: Online Help Viewer with Contents section visible.
5.1 Main parts of the Online Help Viewer : Cohesion's Online Help Viewer contains :
  1. Contents Page : displays the Table of Contents for all help topics as an expandable tree.
  2. Index Page : displays an index in alphabetical order of all displayable help items.
  3. Find Page : allows search of all help topics for a particular word or phrase.
  4. Topic Display : displays the help topics that can be viewed.
  5. Display Pane : displays the contents of the selected help topic.
  6. Close Button : close the Online Help Viewer.
  7. Display Button : display, in the Display Pane, the contents of the selected help topic.
  8. Home : display, in the Display Pane, the Online Help home page.
  9. Back | Forward Buttons : navigate Back and Forward through pages you have already visited.

5.2 Using the Contents Page : The Contents Page (see Figure 5.0 - 1), displays the help topics in a Tree/Branch Table of Contents format. To access the Contents Page, click on the 'Contents' tab on the top-left of the Online Help Viewer.
There are 3 types of items displayed on the Contents Page, these are described below :

Item Description
Closed help branch This represents a closed branch of the tree.
Double-click on the item or single-click the switch icon next to it to expand the branch.
Expanded help branch This represents an expanded branch of the tree.
Double-click on the item or single-click the switch icon next to it to close the branch.
Displayable help item This represents a displayable help item that can be viewed in the Display Pane.
Double-click the item or single-click the item and click the 'Display' button to load it into the Display Pane


5.3 Using the Index Page : The Index Page displays a list of all help topics in alphabetical order (see Figure 2.3 - 2).

Online Help Viewer with Index section visible
Figure 5.3 - 2: Online Help Viewer with Index section visible.

To look up a topic in the Online Help Viewer Index :
  1. Click on the 'Index' tab, (A), on the top-left of the Online Help Viewer,
  2. In the 'Type keyword to find' text field, (B), start typing topic(s) you wish to search for,

    As you type, the index list, (C), will scroll and highlight a topic that best matches, alphabetically, the keywords you have entered. In Figure 2.3 - 2, the letters 'Edi' have been entered into the 'Type keyword to find' text field. The index list has highlighted 'Edit Group' as it is the closest match, alphabetically, to what has been entered in the text field.

  3. Double-click a topic, in the index list to display it,
    or
    Single-click a topic and click the 'Display' button, (D).


5.4 Using the Find Page :
The Find page allows you to search for keyword(s) or phrases in all Cohesion help topics. The search will be performed on the topic headings and also the contents of the help topics. A screen shot of the Help Find Page is displayed below (see Figure 2.3-3).

Online Help Viewer with Find section visible
Figure 5.4 - 3: Online Help Viewer with Find section visible.

The help system allows two types of search :
  • Contain Search : Will search to find a whole match on the words specified.
  • Are Similar To : Same as above, but also includes partial matches.
To search for keyword(s) or phases :
  1. Select a search type,
    • contain
    • are similar to
    from the drop down list,(A),
  2. In the text field next to the drop down list (B), type in the keyword or keywords you wish to search for,
  3. Click the 'Search...' button, (C).

    The search will now start, the Progress Indicator, (D), will display 'Searching...' to indicate that the search is still in progress. The search may take a few minutes to complete.

    When the search is completed, the Progress Indicator will update and display the number of matches found and display a list of topics found in the Search Results List, (E),
  4. Double-click a topic, in the Search Results List to display it,
    or
    Single-click a topic and click the 'Display' button, (F).


6. Navigating around Cohesion Cohesion's Main Window

The following image represents the main screen

Cohesion's Main Window
Figure 6.0 - 1: Cohesion's Main Window

  1. Menu Bar : Displays Cohesion's 6 Menus
  2. Toolbar : Icons representing shortcuts certain Cohesion functions
  3. Workspace Tab/Panel : Displays the Workspace tree. Displayed when drawing Models.
  4. Notation Tab/Panel : Displays the Notation tree. Displayed when creating Notations.
  5. Tool Palette : The various object drawing tools that can be used on the Notation Editor Viewport and Modeller Viewport.
  6. Notation Editor Viewport : Where Notations are created visually.
  7. Meta-Model Builder : Where the Meta-Model Nodes, Arcs and Rules are defined.
  8. Modeller Viewport : Where models are created visually
  9. Command Prompt : The Command Prompt.
  10. Modeller Status: : Any information that the Modeller needs to display to the user, e.g. error message, are displayed here.
  11. Clock : Display the current local time.
  12. Login Status: : Displays your current login status. Whether you are logged in and to which server.


Cohesion's Toolbar

Cohesion's Toolbar
Figure 6.0 - 2: Cohesion's Toolbar

Running from left to right :
  • New Workspace : Create a new Workspace.
  • Open Workspace : Opens an existing Workspace.
  • New Project : Creates a new Project (optionally creates a new Workspace if one isn't already open).
  • Save : Context Sensitive, e.g. if you currently have a Project selected in the Workspace Tab/Panel, it will save the Project.
  • Save All : Save all currently open Workspaces, Projects, Models and Notations.
  • Add/Remove Projects : Add or Remove Projects to the current Workspace.
  • Add/Remove Models : Add or Remove Models from the current Project.
  • Print : Print the currently selected Modeller or Notation Viewport.
  • Help : Display the Help System.
  • Cut : Cut the currently selected text or visual object into the Clipboard.
  • Copy : Copy the currently selected text or visual object into the Clipboard.
  • Paste : Paste from the clipboard to a text field or external application (text-only) or to the Notation Editor Viewport and Modeller Viewport.
  • Undo : Undo your last action
  • Redo : Redo your last action
  • Preferences : Display the preferences dialog.
  • Change Model Notation : Change the Notation that is used for a particular Model.
  • Command Prompt : Display the Command Prompt.
7. How do I? 7.1 Modelling

7.1.1 Create a Modelling Language Refer to Section 4.3 Creating a new Meta-Model and Notation
7.2 Messaging

7.2.1 Sending a Message Refer to, Messaging -> Sending an Instant or Email Message, in the Cohesion Online Help

7.2.2 Viewing Messages Refer to, Messaging -> Viewing Instant Messages, in the Cohesion Online Help

7.3 Repository

7.3.1 Checking-in a file Refer to, Repository -> Adding and Checking In Files, in the Cohesion Online Help

7.3.2 Checking-out a file Refer to, Repository -> Checking Out Files, in the Cohesion Online Help

7.3.3 Setting Permissions and Ownership Refer to, Repository -> Setting Ownership and Permissions of Files, in the Cohesion Online Help

7.4 Address Book

7.4.1 Adding an Entry Refer to, Address Book -> Adding an Entry, in the Cohesion Online Help

7.4.2 Removing an Entry Refer to, Address Book -> Removing an Entry, in the Cohesion Online Help

7.4.3 Editing an Entry Refer to, Address Book -> Editing an Entry, in the Cohesion Online Help

7.5 User Management

7.5.1 Creating a new user account Refer to, User Management --> Create User, in the Cohesion Online Help
7.5.2 Editing a user account Refer to, User Management --> Edit User, in the Cohesion Online Help
7.5.3 Removing a user account Refer to, User Management --> Remove User, in the Cohesion Online Help
7.5.4 Changing a user's password Refer to, User Management --> Change Password, in the Cohesion Online Help
7.5.5 Assigning groups to a user account Refer to, User Management --> Groups, in the Cohesion Online Help
7.5.6 Creating a new group Refer to, User Management --> Create Group, in the Cohesion Online Help
7.5.7 Removing an existing group Refer to, User Management --> Remove Group, in the Cohesion Online Help
7.5.8 Editing an existing group Refer to, User Management --> Edit Group, in the Cohesion Online Help

7.6 Preferences

7.6.1 Setting Messaging System Preferences Refer to, Preferences --> Setting Messaging System Preferences, in the Cohesion Online Help
7.6.2 Setting Modeller Viewer Preferences Refer to, Preferences --> Setting Modeller Viewer Preferences, in the Cohesion Online Help
7.6.3 Setting Colour Preferences Refer to, Preferences --> Setting Colour Preferences, in the Cohesion Online Help
7.6.4 Setting Dialect Preferences Refer to, Preferences --> Setting Dialect Preferences, in the Cohesion Online Help

7.7 Command Prompt

7.7.1 Display the Command Prompt Click the "Command Prompt" icon in the Toolbar
OR
Select "Command Prompt" from the "File" menu.